jdbc
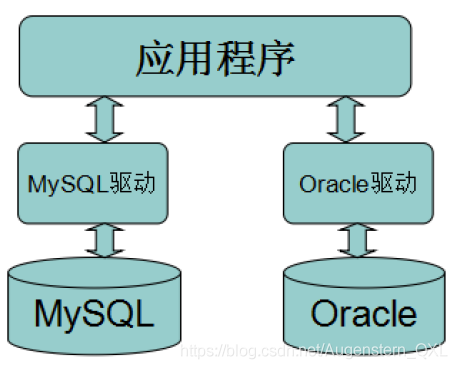
1.概述 1.1、数据库驱动 这里的驱动的概念和平时听到的那种驱动的概念是一样的,比如平时购买的声卡,网卡直接插到计算机上面是不能用的,必须要安装相应的驱动程序之后才能够使用声卡和网卡,同样道理,我们安装好数据库之后,我们的应用程序也是不能直接使用数据库的,必须要通过相应的数据库驱动程序,通过驱动程序去和数据库打交道,如下所示:
1.2、JDBC介绍
JDBC全称为:Java Data Base Connectivity(java数据库连接)
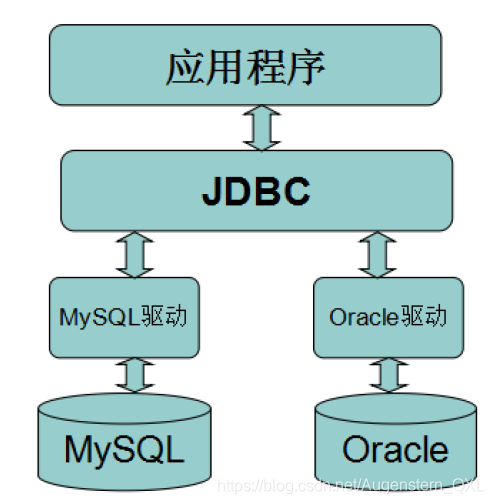
SUN公司为了简化、统一对数据库的操作,定义了一套Java操作数据库的规范(接口),称之为JDBC。
这套接口由数据库厂商去实现,这样,开发人员只需要学习jdbc接口,并通过jdbc加载具体的驱动,就可以操作数据库
1.3、开始准备 组成JDBC的两个jar包:
java.sql
javax.sql
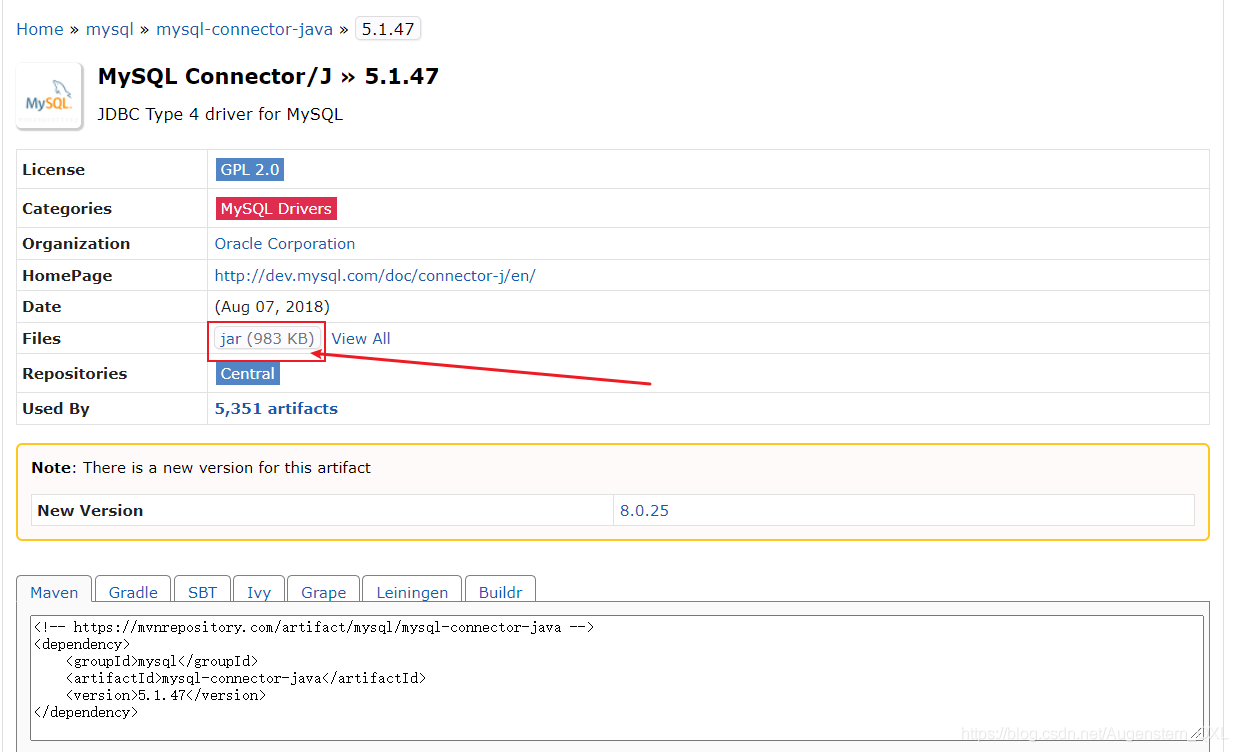
还需要导入一个数据库驱动包 mysql-connector-java
数据库驱动包我们一般去maven仓库
在maven仓库搜索mysql-connector-java,maven仓库地址直达
点击进去选择自己安装的对应的mysql版本
我的mysql版本是5.1.47,所以下载mysql-connector-java-5.1.47
1.4、第一个JDBC程序 创建测试数据库
首先在sqlyog里面创建一个jdbcStudy 表
1
2
3
4
5
6
7
8
9
10
11
12
13
14
15
16
CREATE DATABASE jdbcStudy CHARACTER SET utf8 COLLATE utf8_general_ci;USE jdbcStudy; CREATE TABLE `users`( id INT PRIMARY KEY, NAME VARCHAR (40 ), PASSWORD VARCHAR (40 ), email VARCHAR (60 ), birthday DATE ); INSERT INTO `users`(id,NAME,PASSWORD,email,birthday)VALUES (1 ,'zhansan' ,'123456' ,'zs@sina.com' ,'1980-12-04' ),(2 ,'lisi' ,'123456' ,'lisi@sina.com' ,'1981-12-04' ), (3 ,'wangwu' ,'123456' ,'wangwu@sina.com' ,'1979-12-04' );
创建一个普通项目
导入数据库驱动
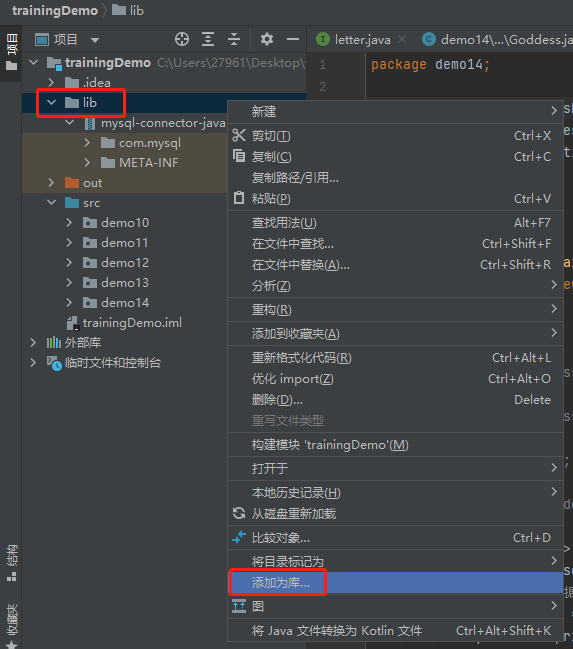
在model(项目)下创建一个director(目录),命名为lib
将 mysql-connection-java 包复制粘贴进来
右键- Add as Library(添加为库)
下面来开始我们的第一个JDBC程序,编写程序从user表中读取数据,并打印在命令行窗口中
1
2
3
4
5
6
7
8
9
10
11
12
13
14
15
16
17
18
19
20
21
22
23
24
25
26
27
28
29
30
31
public class JDBC_Demo01 { public static void main (String[] args) throws ClassNotFoundException, SQLException { Class.forName("com.mysql.cj.jdbc.Driver" ); String url = "jdbc:mysql://localhost:3306/数据库名字?useUnicode=true&characterEncoding=utf8&useSSL=true" ; String username = "root" ; String password = "root" ; Connection connection = DriverManager.getConnection(url, username, password); Statement statement = connection.createStatement(); String sql = "SELECT * FROM users" ; ResultSet resultSet = statement.executeQuery(sql); while (resultSet.next()){ System.out.println("id=" +resultSet.getObject("id" )); System.out.println("NAME=" +resultSet.getObject("NAME" )); System.out.println("PASSWORD=" +resultSet.getObject("PASSWORD" )); System.out.println("email=" +resultSet.getObject("email" )); System.out.println("birthday=" +resultSet.getObject("birthday" )); } resultSet.close(); statement.close(); connection.close(); } }
步骤总结:
加载驱动
连接数据库 DriverManager
获得执行sql的对象 Statement
获得返回的结果集
释放连接
2.对象说明 2.1、DriverManager
Jdbc程序中的DriverManager用于加载驱动,并创建与数据库的连接
1 2 3 4 5 6 7 8 9 10 11 Connection connection = DriverManager.getConnection(url, username, password);connection.commit(); connection.rollback(); connection.setAutoCommit(true ); connection.setAutoCommit(false );
2.2、URL URL用于标识数据库的位置,通过URL地址告诉JDBC程序连接哪个数据库,URL的写法为:
1 2 3 String url = "jdbc:mysql://localhost:3306/jdbcstudy?useUnicode=true&characterEncoding=utf8&SSL=true" ;
useUnicode=true支持中文编码
characterEncoding=utf8 设置中文字符集为utf-8
SSL=true 使用安全的连接
常用数据库URL地址的写法:
Oracle写法:jdbc:oracle:thin:@localhost:1521:sid
SqlServer写法:jdbc:microsoft:sqlserver://localhost:1433; DatabaseName=sid
MySql写法:jdbc:mysql://localhost:3306/sid
2.3、Statement Jdbc程序中的Statement对象用于向数据库发送SQL语句, Statement对象常用方法:
executeQuery(String sql):用于向数据发送查询语句。
executeUpdate(String sql):用于向数据库发送insert、update或delete语句
execute(String sql):用于向数据库发送任意sql语句
1 2 3 4 5 6 Statement statement = connection.createStatement();statement.executeQuery(sql); statement.execute(sql); statement.executeUpdate();
2.4、ResltSet Jdbc程序中的ResultSet用于代表Sql语句的执行结果,ResultSet是用于封装执行结果的,所以该对象提供的都是用于获取数据的get方法:
ResultSet 查询的结果集,封装了所有的结果集
1 2 3 4 5 6 7 8 9 ResultSet resultSet = statement.executeQuery(sql);resultSet.getObject(); resultSet.getString(); resultSet.getInt(); resultSet.getFloat(); resultSet.getDate();
2.5、释放资源 1 2 3 resultSet.close(); statement.close(); connection.close();
3.statement对象详解 jdbc中statement对象:
用于向数据库发送SQL语句
想完成对数据库的增删改查,只需要通过这个对象向数据库发送增删改查语句即可
Statement 对象的 executeUpdate 方法,用于向数据库发送增删改查的sql语句
executeUpdate 执行完后,将会返回一个整数(即增删改查语句导致了数据库几行数据发生变化)
Statement.executeQuery方法用于向数据库发送查询语句
executeQuery方法返回代表查询结果的ResultSet对象
3.1、create操作 使用executeUpdate(String sql)方法完成数据添加操作,示例操作
1 2 3 4 5 6 Statement st = conn.createStatement();String sql = "insert into user(….) values(…..) " ;int num = st.executeUpdate(sql);if (num>0 ){ System.out.println("插入成功!!!" ); }
3.2、update操作 使用executeUpdate(String sql)方法完成数据修改操作,示例操作:
1
2
3
4
5
6
Statement st = conn.createStatement();String sql = "update user set name='' where name=''" ;int num = st.executeUpdate(sql);if (num>0 ){ System.out.println("修改成功!!!" ); }
3.3、read操作 使用executeQuery(String sql)方法完成数据查询操作,示例操作:
1
2
3
4
5
6
Statement st = conn.createStatement();String sql = "select * from user where id=1" ;ResultSet rs = st.executeUpdate(sql);while (rs.next()){ }
4.JdbcUtils工具类封装
在src目录下创建一个db.properties文件,代码如下(可根据自己的数据库名账户密码修改)
1 2 3 4 5 driver=com.mysql.cj.jdbc.Driver url=jdbc:mysql: useUnicode=true &characterEncoding=utf8&useSSL=true username=root password=root
新建 utils 包,新建一个类JdbcUtils,代码如下
1 2 3 4 5 6 7 8 9 10 11 12 13 14 15 16 17 18 19 20 21 22 23 24 25 26 27 28 29 30 31 32 33 34 35 36 37 38 39 40 41 42 43 44 45 46 47 48 49 50 51 52 53 54 55 56 57 58 59 60 import java.io.InputStream;import java.sql.*;import java.util.Properties;public class JdbcUtils { private static String driver = null ; private static String url = null ; private static String username = null ; private static String password = null ; static { try { InputStream in = JdbcUtils.class.getClassLoader().getResourceAsStream("db.properties" ); Properties properties = new Properties (); properties.load(in); driver = properties.getProperty("driver" ); url = properties.getProperty("url" ); username = properties.getProperty("username" ); password = properties.getProperty("password" ); Class.forName(driver); }catch (Exception e){ e.printStackTrace(); } } public static Connection getConnection () throws Exception { return DriverManager.getConnection(url,username,password); } public static void release (Connection conn, Statement st, ResultSet rs) { if (rs != null ){ try { rs.close(); }catch (Exception e){ e.printStackTrace(); } } if (st != null ){ try { st.close(); }catch (Exception e){ e.printStackTrace(); } } if (conn != null ){ try { conn.close(); }catch (Exception e){ e.printStackTrace(); } } } }
4.1、插入数据 1 2 3 4 5 6 7 8 9 10 11 12 13 14 15 16 17 18 19 20 21 22 23 public class TestInsert { public static void main (String[] args) { Connection conn = null ; Statement st = null ; ResultSet rs = null ; try { conn = JdbcUtils.getConnection(); st = conn.createStatement(); String sql = "INSERT INTO users(id,`NAME`,`PASSWORD`,`email`,`birthday`)" + "VALUES(5,'kuangshen','123456','123456@qq.com','2020-01-01')" ; int i = st.executeUpdate(sql); if (i>0 ){ System.out.println("插入成功" ); } } catch (Exception e) { e.printStackTrace(); }finally { JdbcUtils.release(conn,st,rs); } } }
4.2、删除数据 1 2 3 4 5 6 7 8 9 10 11 12 13 14 15 16 17 18 19 20 21 22 public class TestDelete { public static void main (String[] args) { Connection conn = null ; Statement st = null ; ResultSet rs = null ; try { conn = JdbcUtils.getConnection(); st = conn.createStatement(); String sql = "delete from users where id=4" ; int i = st.executeUpdate(sql); if (i>0 ){ System.out.println("删除成功" ); } } catch (Exception e) { e.printStackTrace(); }finally { JdbcUtils.release(conn,st,rs); } } }
4.3、更新数据 1 2 3 4 5 6 7 8 9 10 11 12 13 14 15 16 17 18 19 20 21 22 23 public class TestUpdate { public static void main (String[] args) { Connection conn = null ; Statement st = null ; ResultSet rs = null ; try { conn = JdbcUtils.getConnection(); st = conn.createStatement(); String sql = "update users set name='kuangshen',email='24736743@qq.com' where id=3" ; int i = st.executeUpdate(sql); if (i>0 ){ System.out.println("更新成功" ); } } catch (Exception e) { e.printStackTrace(); }finally { JdbcUtils.release(conn,st,rs); } } }
4.4、查找数据
查询用的是excuteQuery(sql),并且返回的结果集是ResultSet
1 2 3 4 5 6 7 8 9 10 11 12 13 14 15 16 17 18 19 20 21 22 23 public class TestSelect { public static void main (String[] args) { Connection conn = null ; Statement st = null ; ResultSet rs = null ; try { conn = JdbcUtils.getConnection(); st = conn.createStatement(); String sql = "select * from users where id = 3" ; rs = st.executeQuery(sql); while (rs.next()){ System.out.println(rs.getString("name" )); } } catch (Exception e) { e.printStackTrace(); }finally { JdbcUtils.release(conn,st,rs); } } }
5.SQL注入
通过巧妙的技巧来拼接字符串,造成SQL短路,从而获取数据库数据
大白话:SQL存在漏洞,会被攻击导致数据泄露
1 2 3 4 5 6 7 8 9 10 11 12 13 14 15 16 17 18 19 20 21 22 23 24 25 26 27 28 29 30 31 32 public class TestSQL 注入 { public static void main (String[] args) { login("kuangshen" ,"123456" ); } public static void login (String username,String password) { Connection conn = null ; Statement st = null ; ResultSet rs = null ; try { conn = JdbcUtils.getConnection(); st = conn.createStatement(); String sql = "select * from users where `name` = '" +username+"' and `password` = '" +password+"'" ; rs= st.executeQuery(sql); while (rs.next()){ System.out.println(rs.getString("name" )); } } catch (Exception e) { e.printStackTrace(); }finally { JdbcUtils.release(conn,st,rs); } } }
6.PreparedStatement 对象
可以防止SQL注入,并且效率更高
PreparedStatement 是Statement的子类
Connection.createStament() 方法获得Statement对象
Connection.preparedStatement(sql) 方法获得preparedStatement对象
Statement会使数据库频繁编译SQL,可能造成数据库缓冲区溢出
PreparedStatement可对SQL进行预编译,从而提高数据库的执行效率。并且PreperedStatement对于sql中的参数,允许使用占位符的形式进行替换,简化sql语句的编写。
6.1、插入数据
1 2 3 4 5 6 7 8 9 10 11 12 13 14 15 16 17 18 19 20 21 22 23 24 25 26 27 28 29 30 31 32 33 34 35 36 public class JDBC_Insert { public static void main (String[] args) { Connection conn = null ; PreparedStatement st = null ; ResultSet rs = null ; try { conn = JdbcUtils.getConnection(); String sql = "INSERT INTO users(id,`NAME`,`PASSWORD`,`email`,`birthday`) values(?,?,?,?,?)" ; st = conn.prepareStatement(sql); st.setInt(1 ,6 ); st.setString(2 ,"qinxiao" ); st.setString(3 ,"1232112" ); st.setString(4 ,"110123@qq.com" ); st.setDate(5 ,new java .sql.Date(new Date ().getTime())); int i = st.executeUpdate(); if (i > 0 ){ System.out.println("插入成功!" ); } } catch (Exception e) { e.printStackTrace(); }finally { JdbcUtils.release(conn,st,null ); } } }
6.2、删除数据 1 2 3 4 5 6 7 8 9 10 11 12 13 14 15 16 17 18 19 20 21 22 23 24 25 26 27 28 29 30 31 32 33 public class JDBC_Delete { public static void main (String[] args) { Connection conn = null ; PreparedStatement st = null ; ResultSet rs = null ; try { conn = JdbcUtils.getConnection(); String sql = "delete from users where id=?" ; st = conn.prepareStatement(sql); st.setInt(1 ,4 ); int i = st.executeUpdate(); if (i > 0 ){ System.out.println("删除成功!" ); } } catch (Exception e) { e.printStackTrace(); }finally { JdbcUtils.release(conn,st,null ); } } }
6.3、更新数据 1 2 3 4 5 6 7 8 9 10 11 12 13 14 15 16 17 18 19 20 21 22 23 24 25 26 27 28 29 30 31 public class JDBC_Update { public static void main (String[] args) { Connection conn = null ; PreparedStatement st = null ; ResultSet rs = null ; try { conn = JdbcUtils.getConnection(); String sql = "update users set `name`=? where id=?" ; st = conn.prepareStatement(sql); st.setString(1 ,"晓琳" ); st.setInt(2 ,1 ); int i = st.executeUpdate(); if (i > 0 ){ System.out.println("修改成功!" ); } } catch (Exception e) { e.printStackTrace(); }finally { JdbcUtils.release(conn,st,null ); } } }
6.4、查找数据 1 2 3 4 5 6 7 8 9 10 11 12 13 14 15 16 17 18 19 20 21 22 23 24 25 26 27 28 29 30 31 public class JDBC_Select { public static void main (String[] args) { Connection conn = null ; PreparedStatement st = null ; ResultSet rs = null ; try { conn = JdbcUtils.getConnection(); String sql = "select * from users where id = ?" ; st = conn.prepareStatement(sql); st.setInt(1 ,1 ); rs = st.executeQuery(); while (rs.next()){ System.out.println(rs.getString("NAME" )); System.out.println(rs.getString("PASSWORD" )); System.out.println("=================" ); } } catch (Exception e) { e.printStackTrace(); }finally { JdbcUtils.release(conn,st,rs); } } }
6.5、避免SQL注入 1 2 3 4 5 6 7 8 9 10 11 12 13 14 15 16 17 18 19 20 21 22 23 24 25 26 27 28 29 30 31 public class JDBC_ 避免SQL注入 { public static void main (String[] args) { login("zhangsan" ,"123456" ); login("'or '1=1" ,"123456" ); } public static void login (String username,String password) { Connection conn = null ; PreparedStatement st = null ; ResultSet rs = null ; try { conn = JdbcUtils.getConnection(); String sql = "select * from users where name=? and password=?" ; st = conn.prepareStatement(sql); st.setString(1 ,username); st.setString(2 ,password); rs = st.executeQuery(); while (rs.next()){ System.out.println(rs.getString("name" )); System.out.println(rs.getString("password" )); System.out.println("==============" ); } } catch (Exception e) { e.printStackTrace(); }finally { JdbcUtils.release(conn,st,rs); } } }
prepareStatement 防止SQL注入的本质,把传递进来的参数当做字符
假设其中存在转义字符,就直接忽略,比如说引号会被直接转义
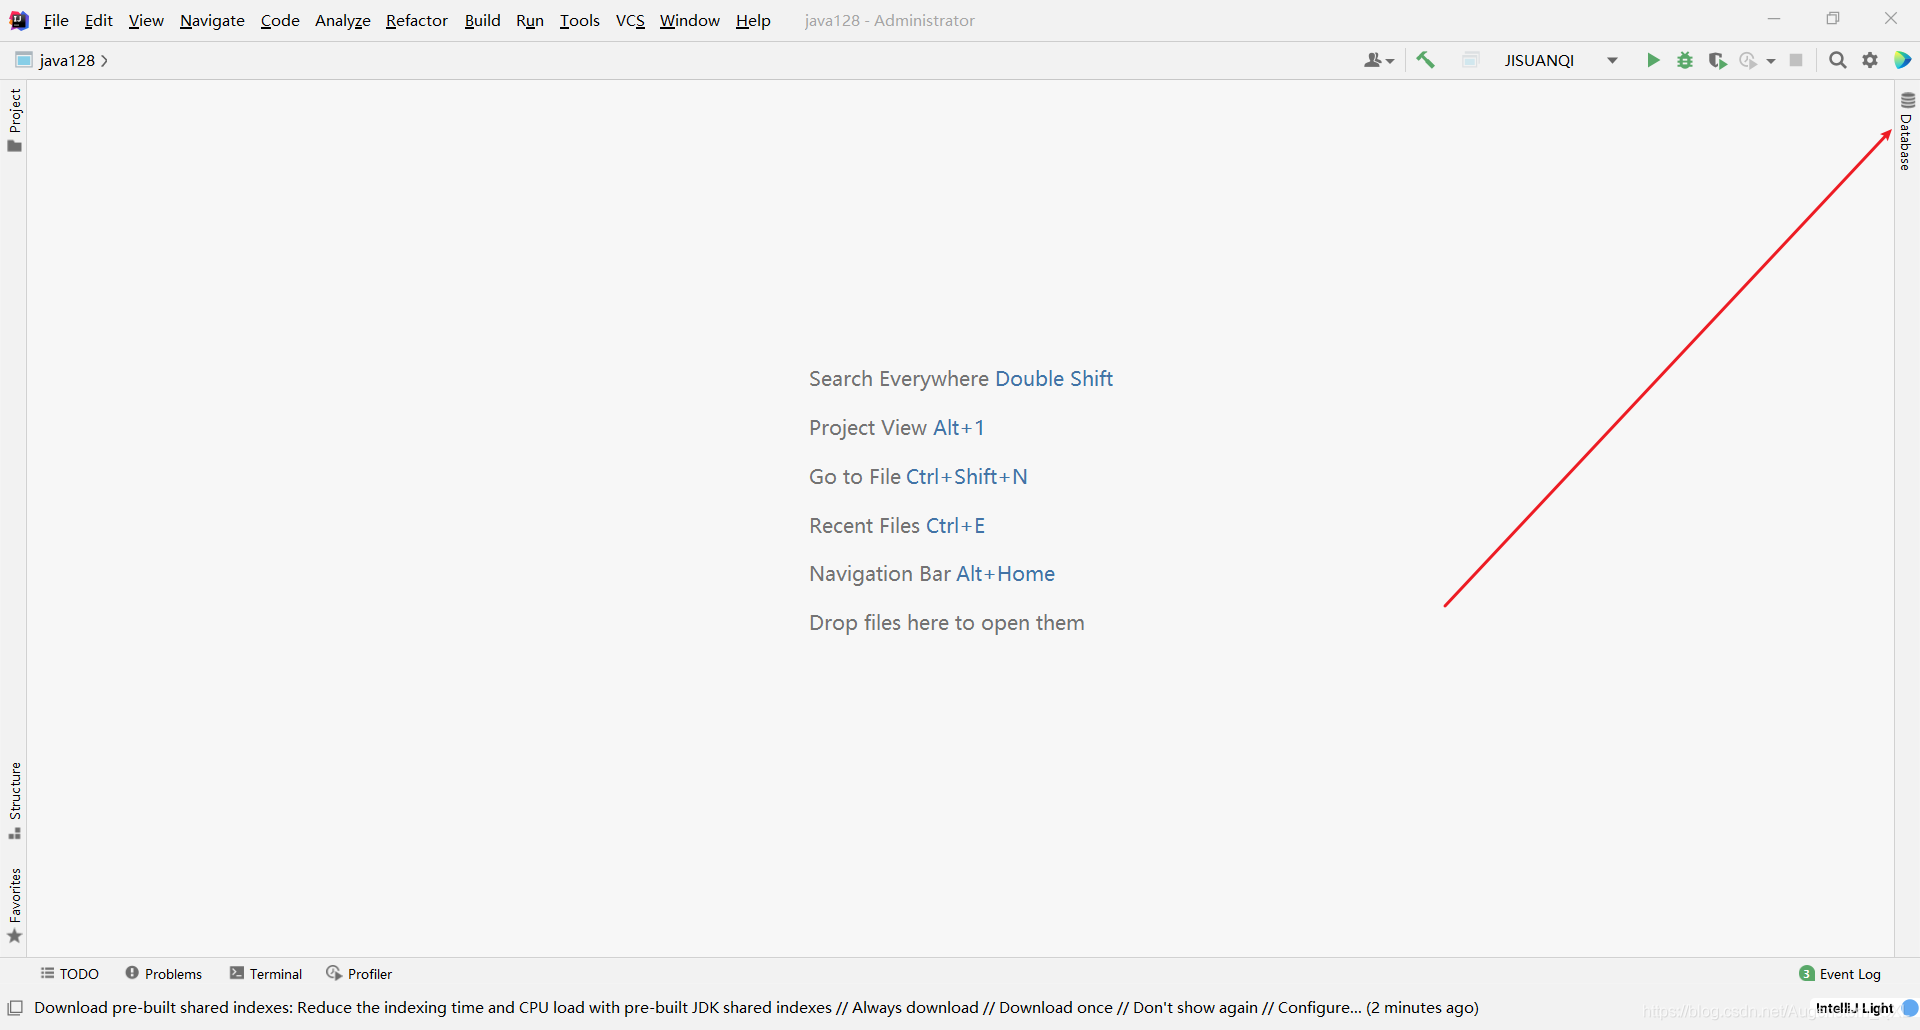
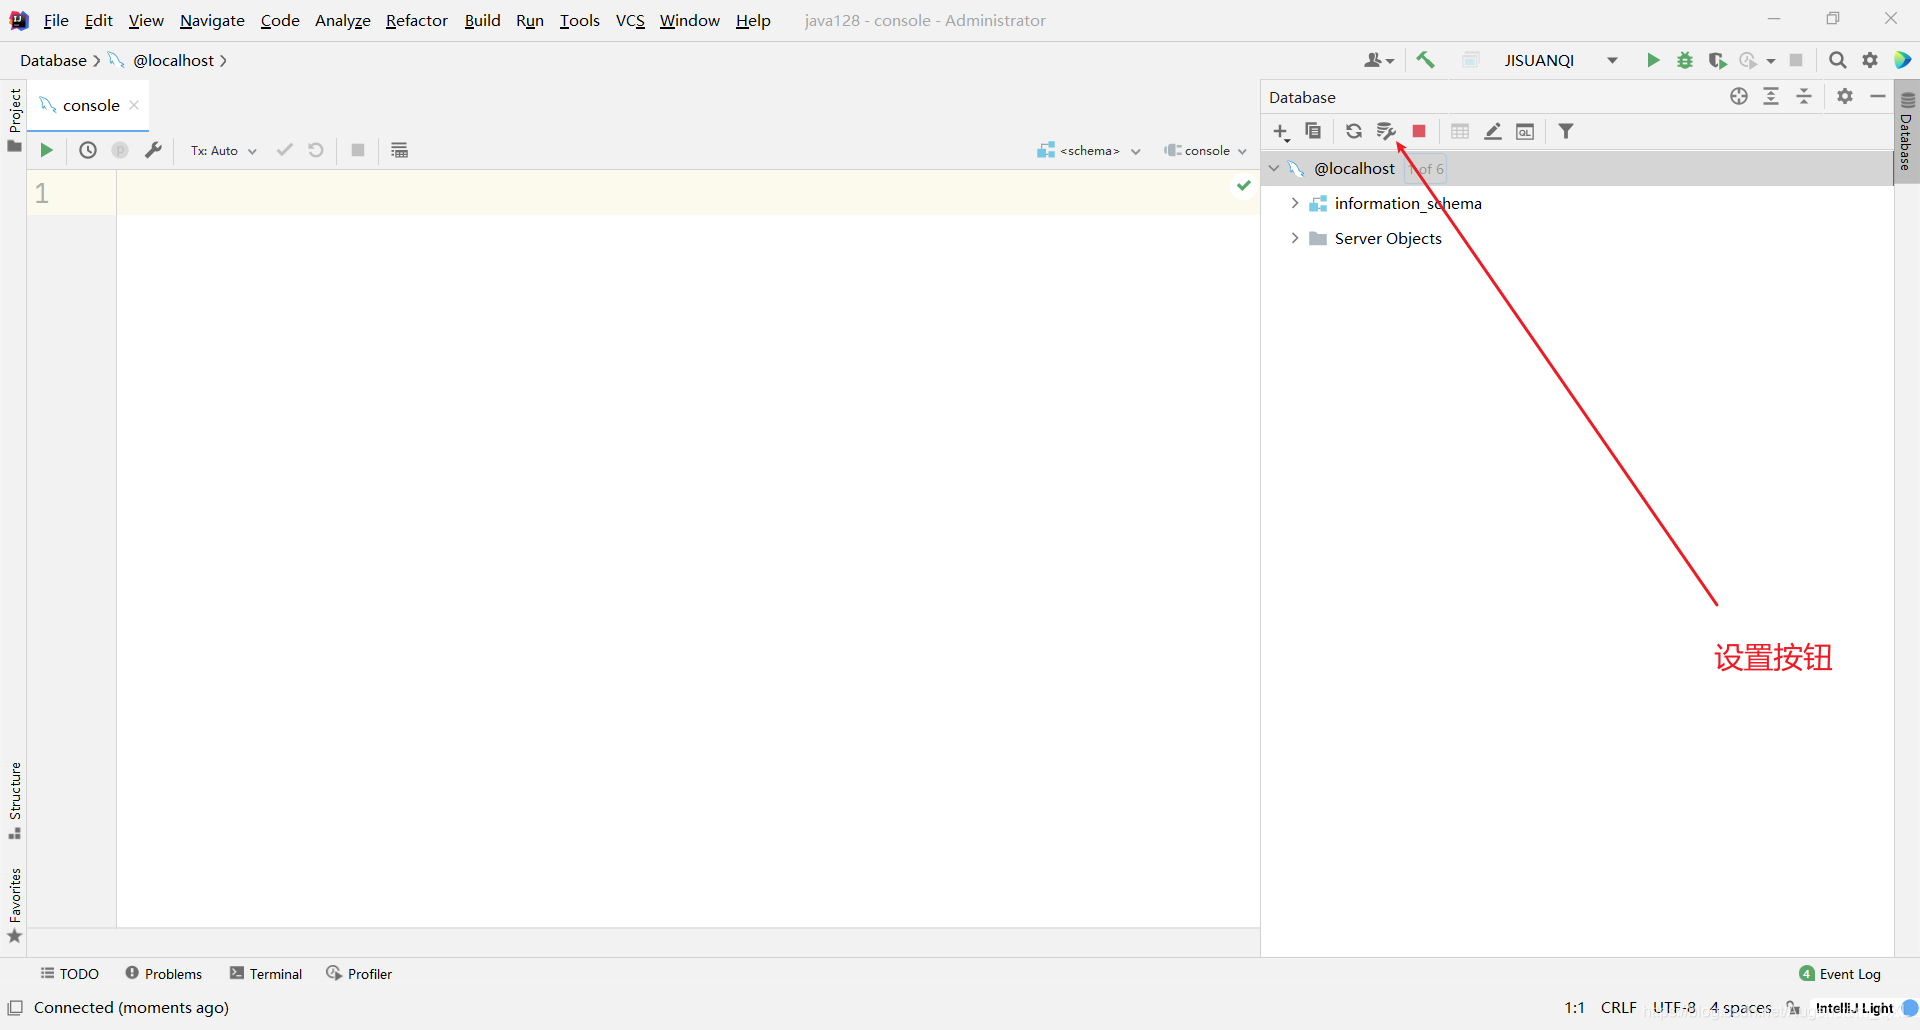
7.IDEA连接数据库
在用IDEA连接数据库之前,要确保mysql-connection-java.jar包导入,过程请参照目录1.3
打开IDEA
点击右侧的Database
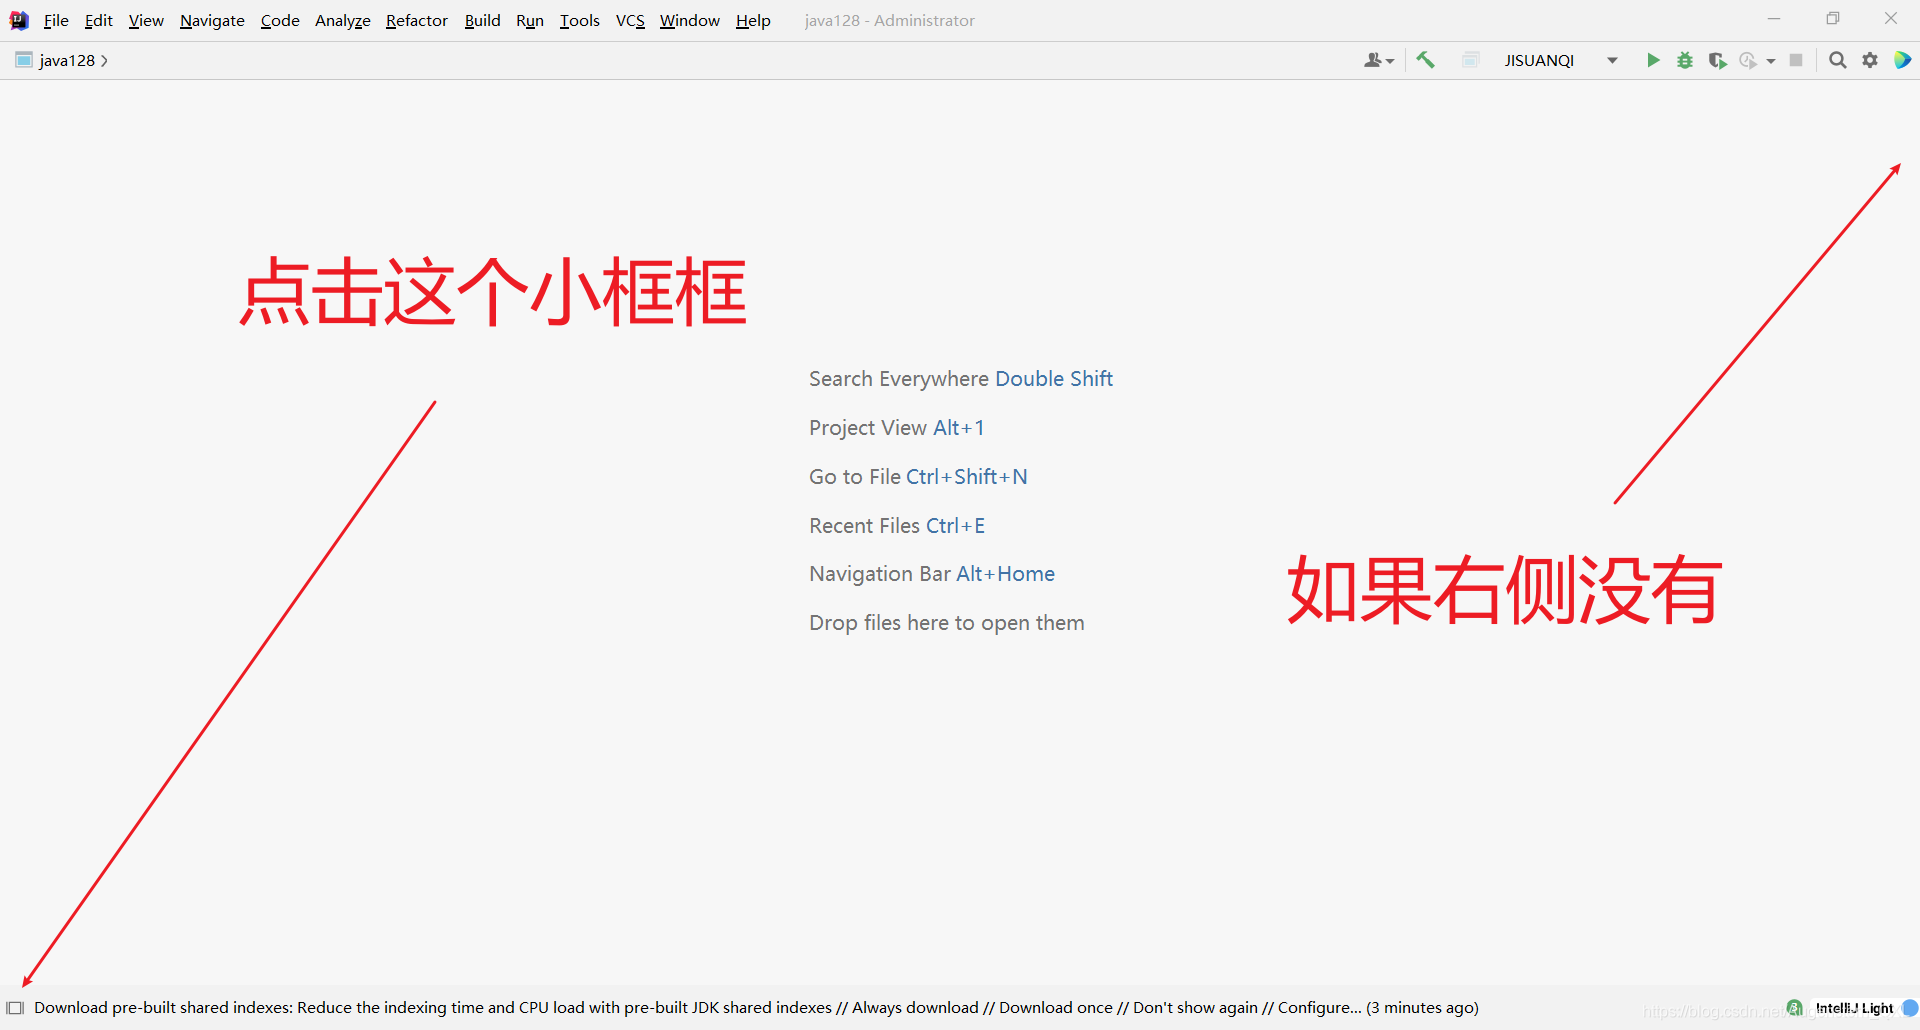
如果你的右侧没有Database,点击左下角小框框就会出来
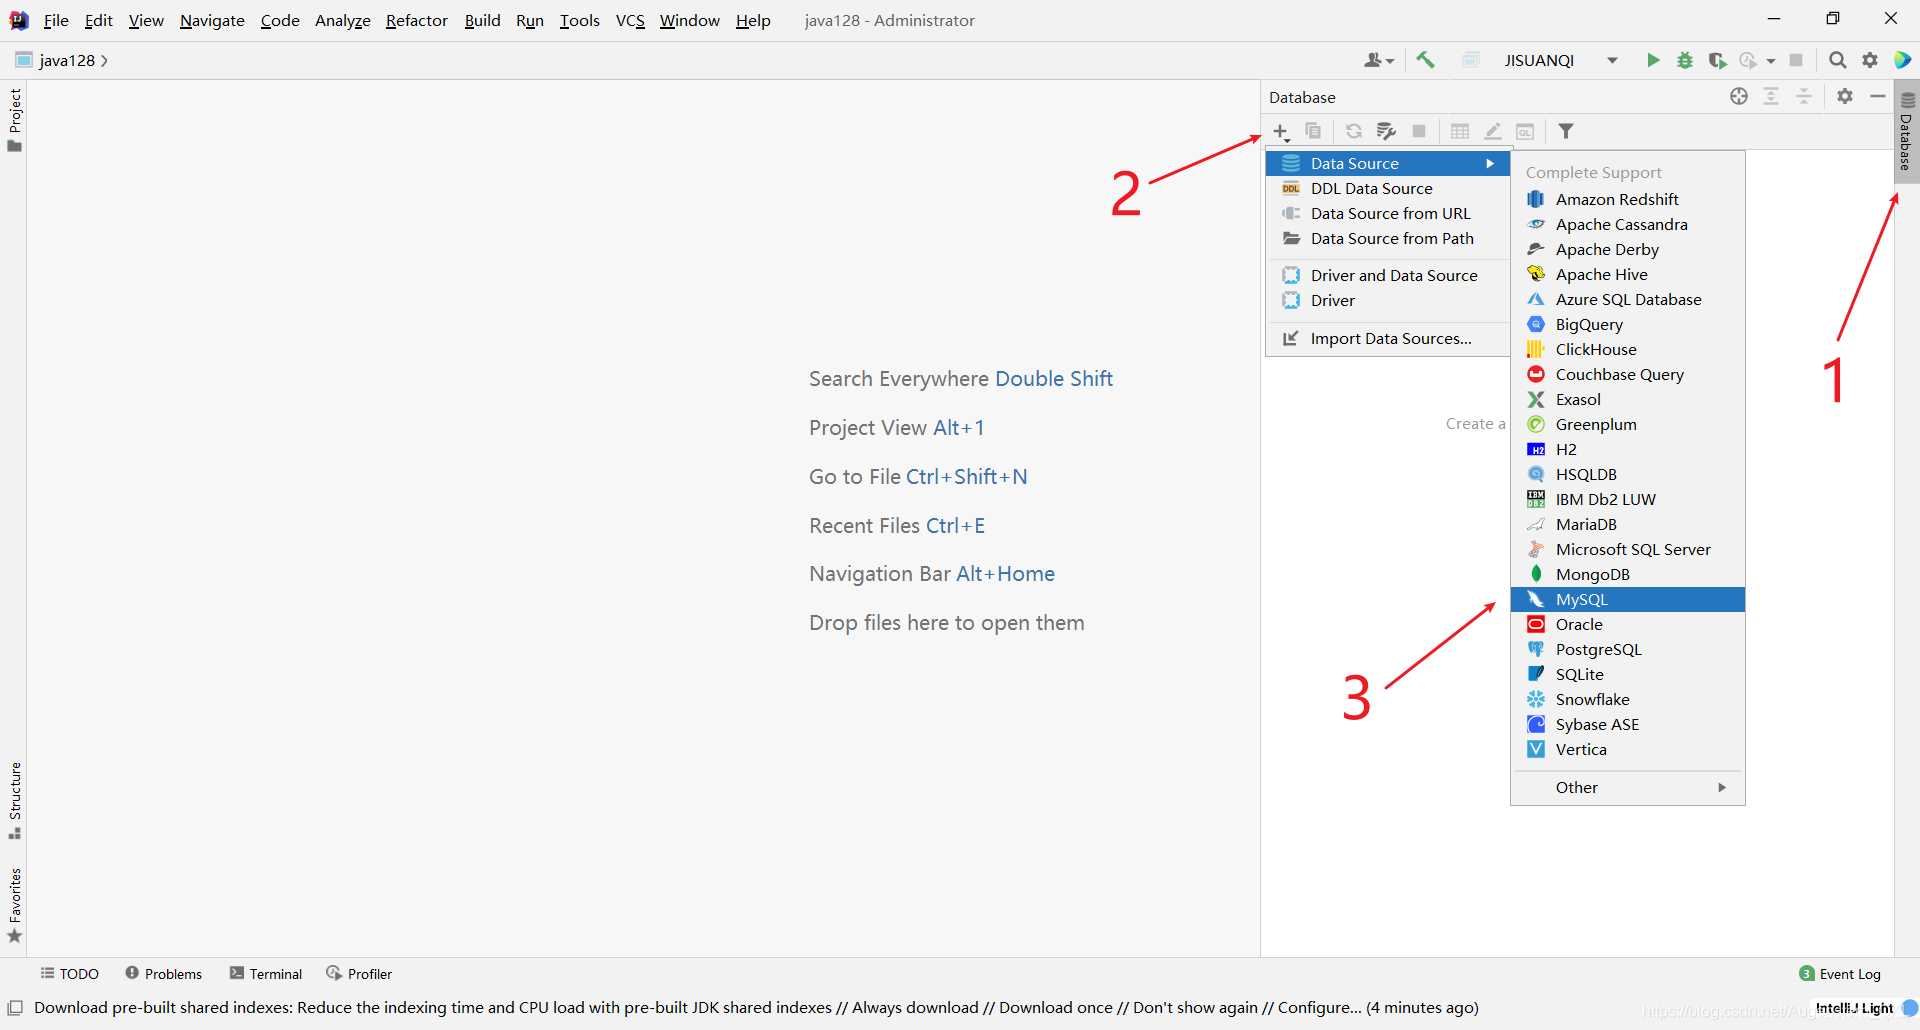
点击Database
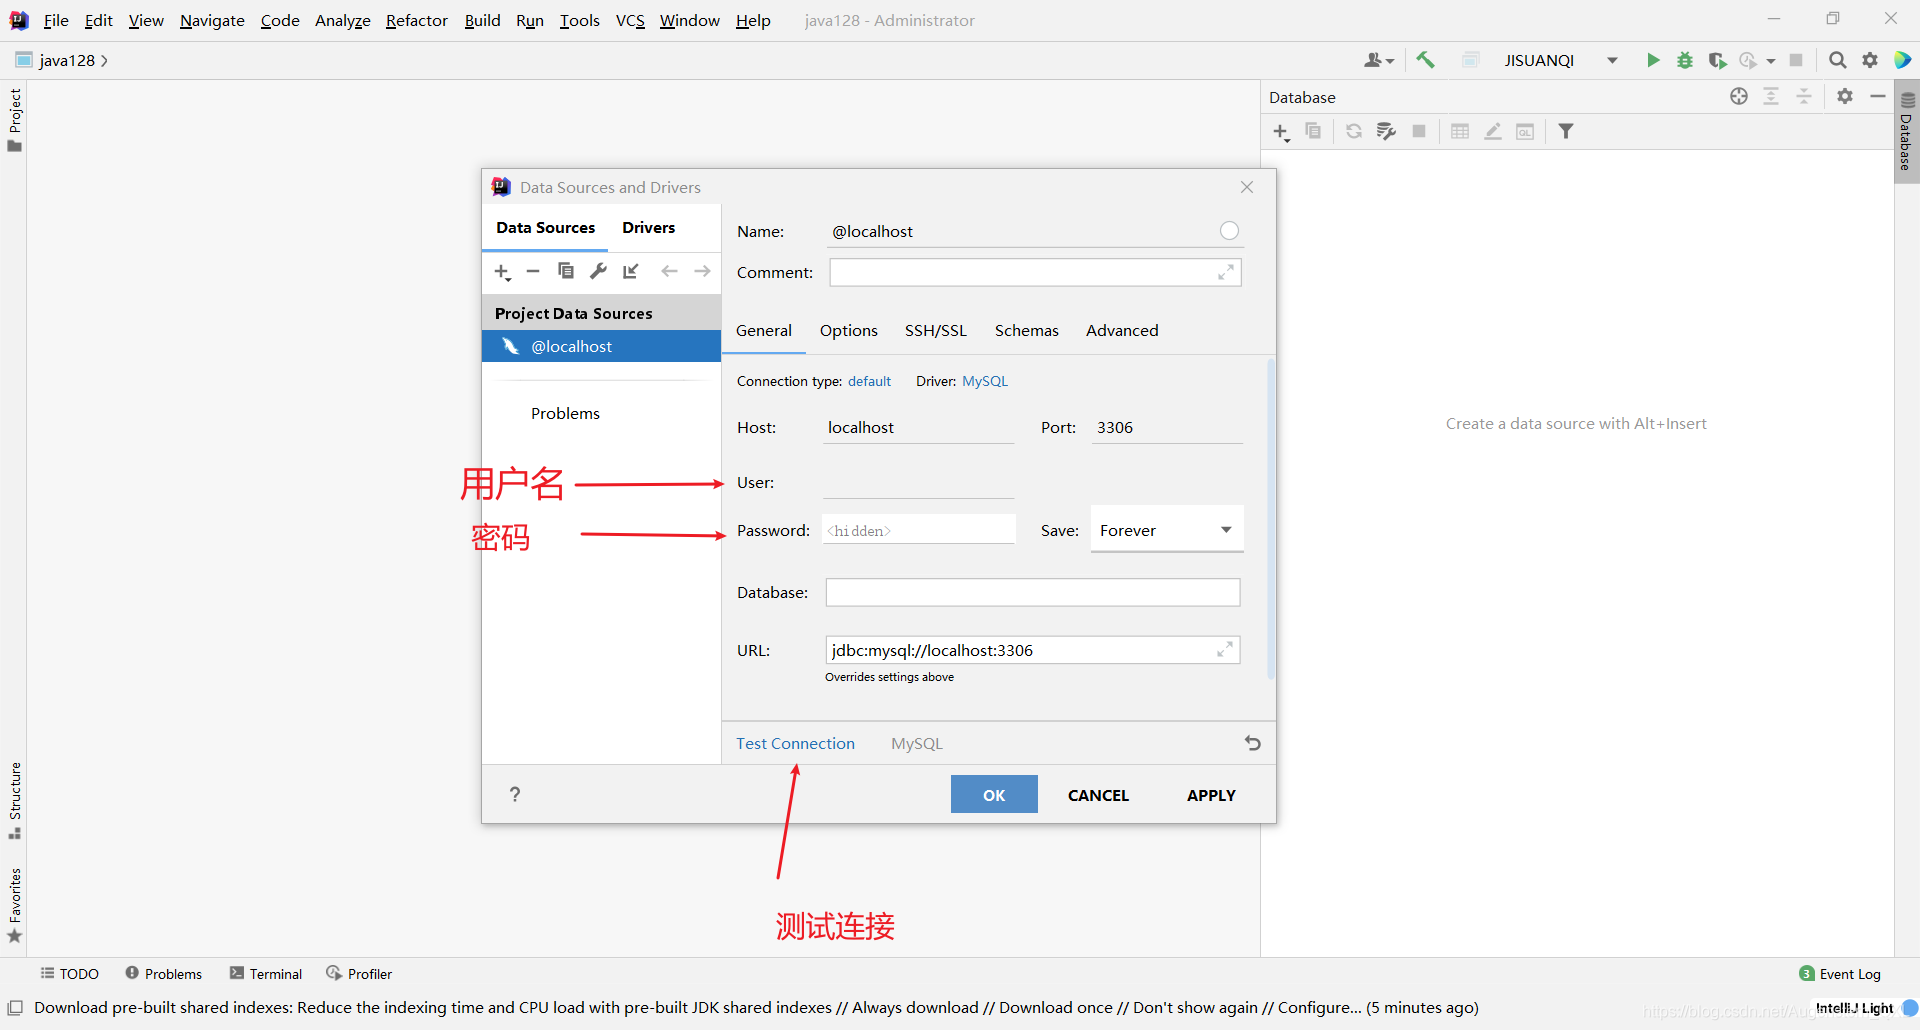
输入数据库用户名密码测试连接
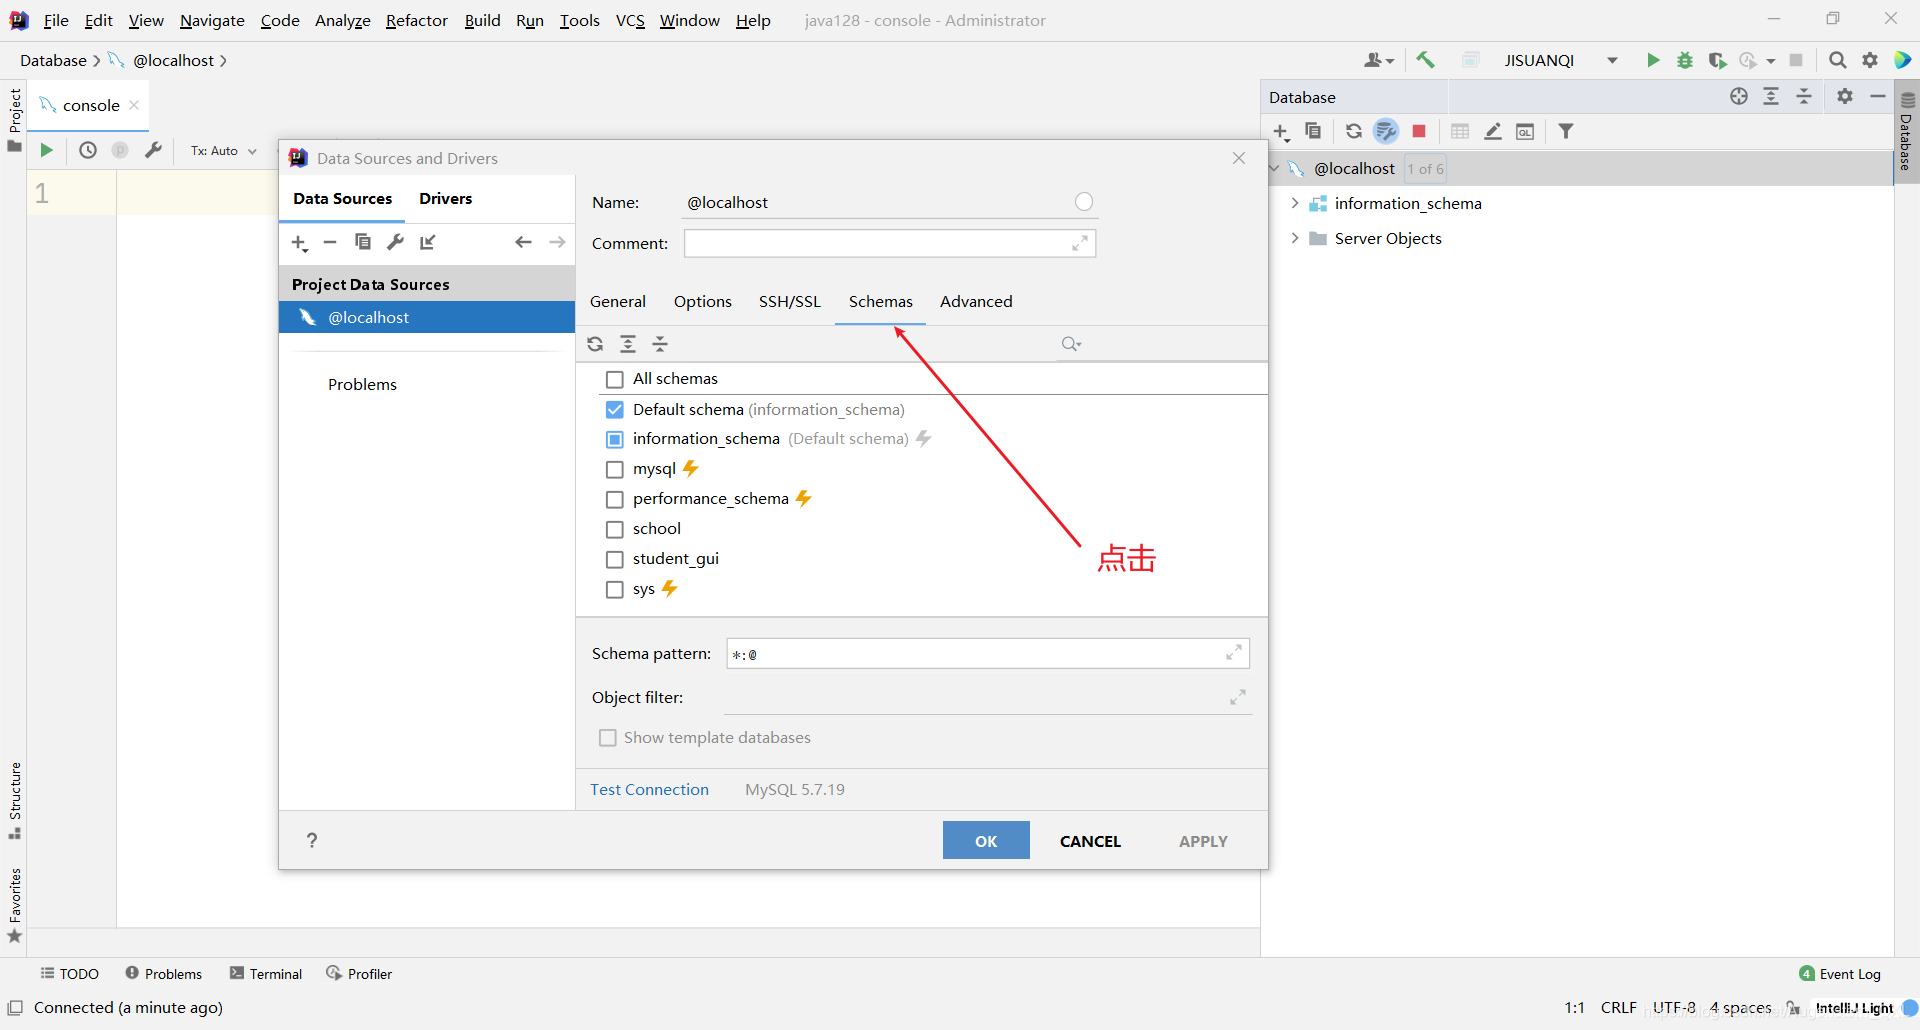
连接成功后可以修改连接的数据库
点击Schemas,可以勾选自己想连接的数据库即可
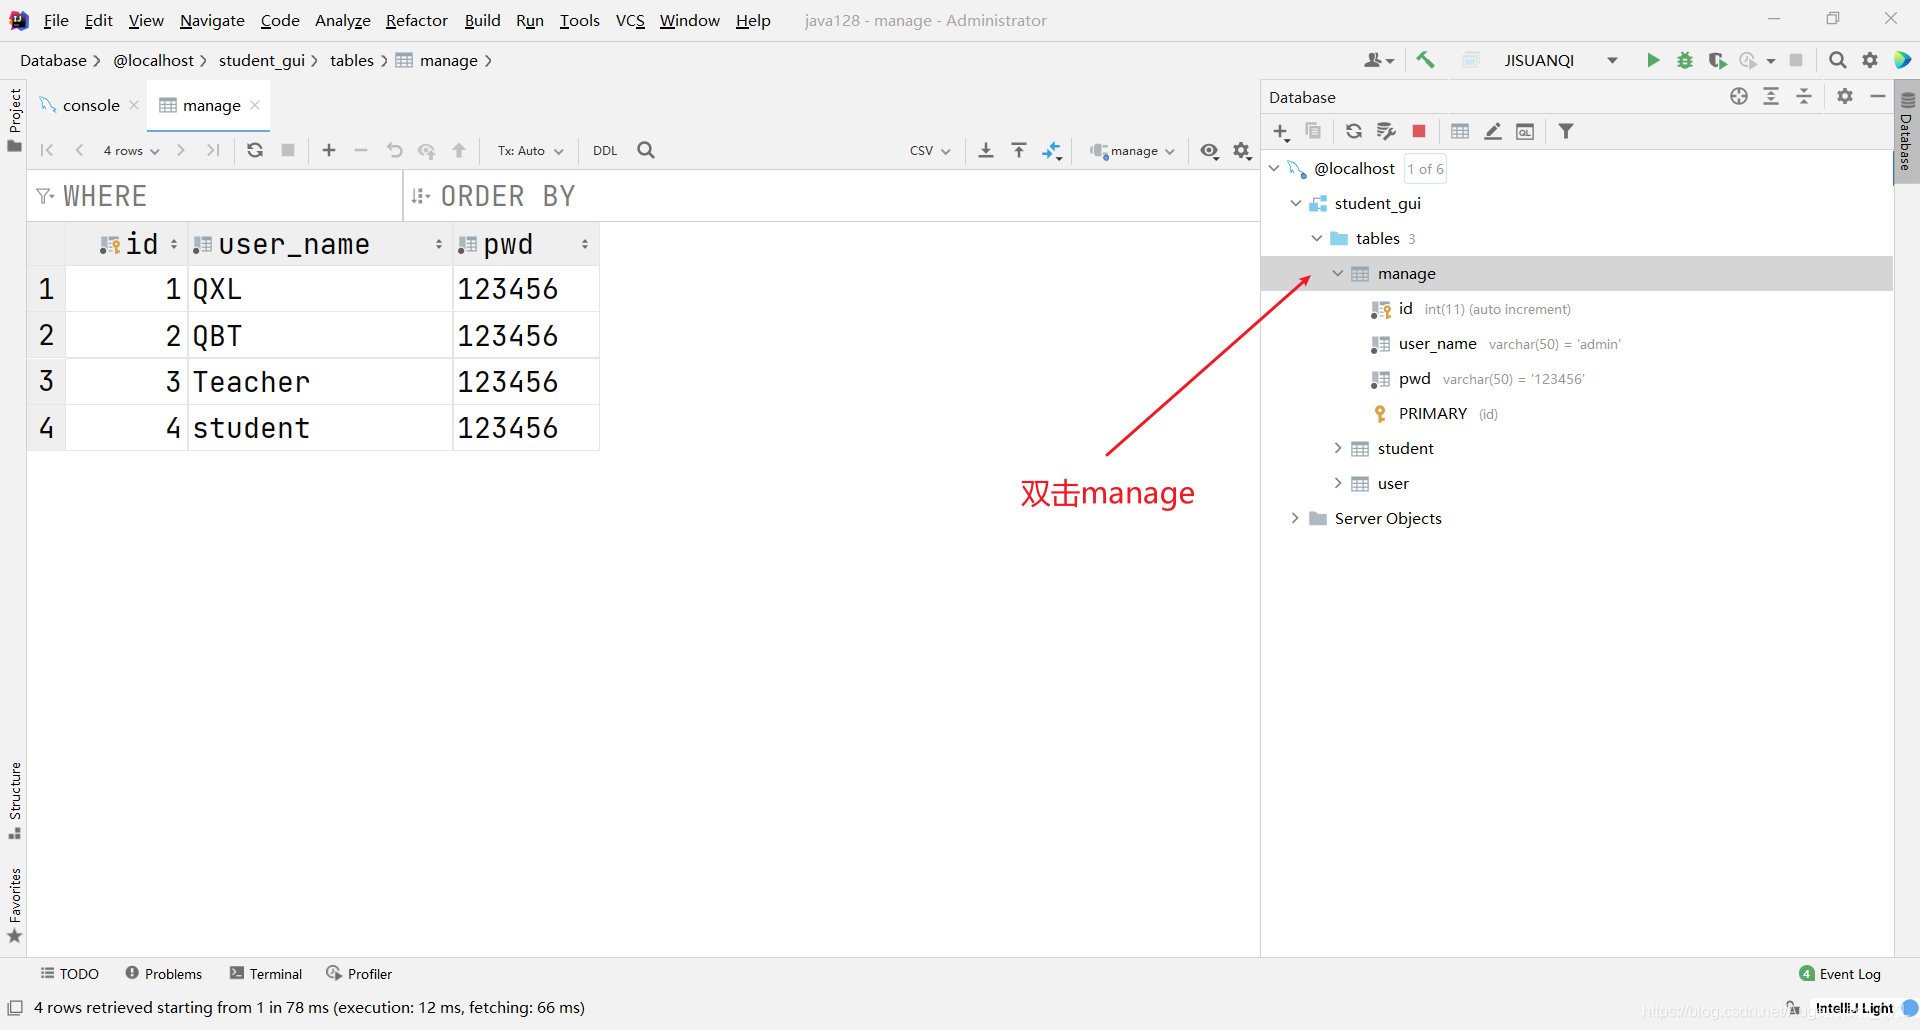
双击表即可打开表中数据
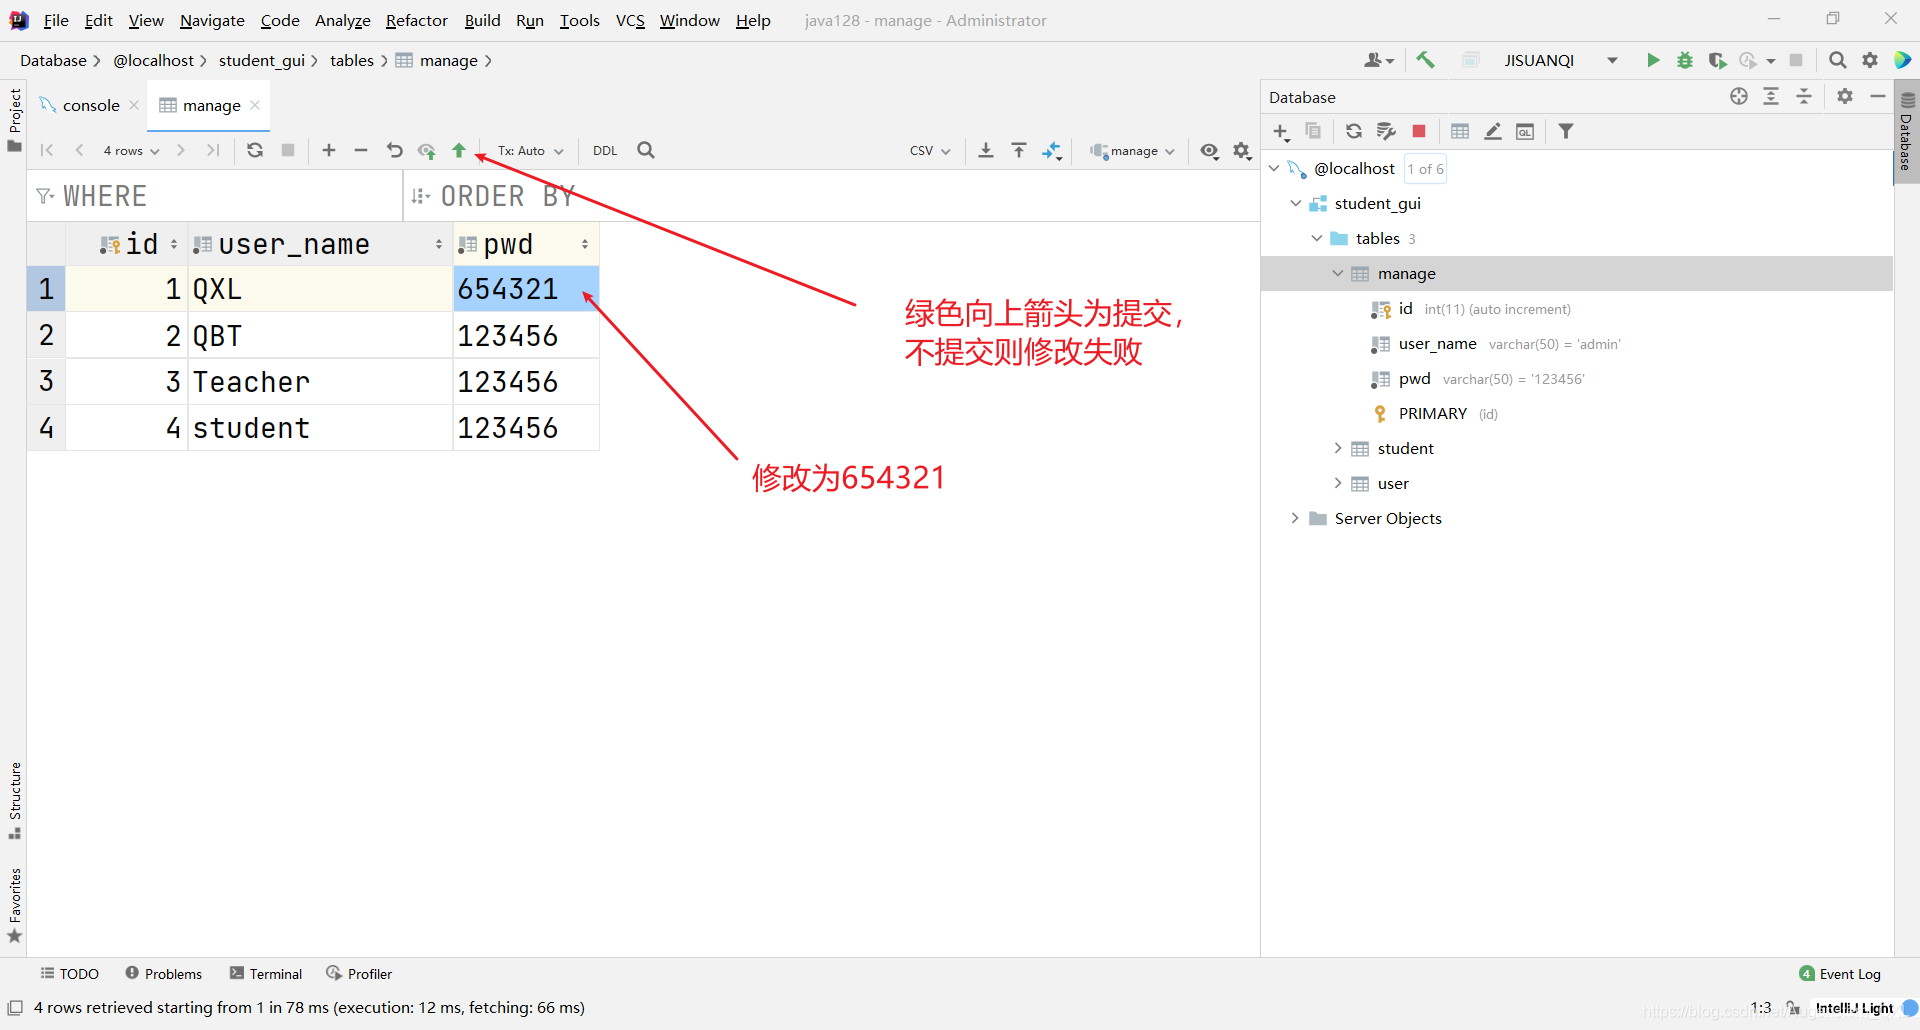
在表中可以直接修改,但是修改完要进行提交
8.JDBC操作事务 步骤:
开启事务:conn.setAutoCommit(false);
这里的 fasle 是因为关闭数据库自动提交,事务会自动开启
在sql中需要两步,但是在java中只需要一步
1 2 SET autocommit = 0 ; start transaction;
一组业务执行完毕,提交事务
可以在 catch 语句中显式的定义回滚语句
1 2 3 4 5 6 7 8 9 10 11 12 13 14 15 16 17 18 19 20 21 22 23 24 25 26 27 28 29 30 31 32 33 34 35 36 37 public class TransactionDemo01 { public static void main (String[] args) { Connection conn = null ; PreparedStatement st = null ; ResultSet rs = null ; try { conn = JdbcUtils.getConnection(); conn.setAutoCommit(false ); String sql1 = "update account set money = money-100 where name ='A" ; st = conn.prepareStatement(sql1); st.executeUpdate(); String sql2 = "update account set money = money+100 where name ='B" ; st = conn.prepareStatement(sql2); st.executeUpdate(); int x = 1 /0 ; conn.commit(); System.out.println("成功" ); }catch (Exception e){ try { conn.rollback(); } catch (SQLException throwables) { throwables.printStackTrace(); } e.printStackTrace(); } } }
9.数据库连接池 数据库连接➡执行完毕 ➡ 释放资源,在连接 ➡ 释放这个过程中,十分浪费资源,因此池化技术就出现了。
池化技术:准备一些预先的资源,过来就连接预先准备好的 最小连接数:10
最大连接数:15
超过最大连接数则后面的需要排队等待
等待超时:100ms
9.1、步骤 编写连接池,实现一个接口 DataSource
开源数据源实现(拿来即用)
使用了这些数据库连接池之后,我们在项目开发中就不需要编写连接数据库的代码了
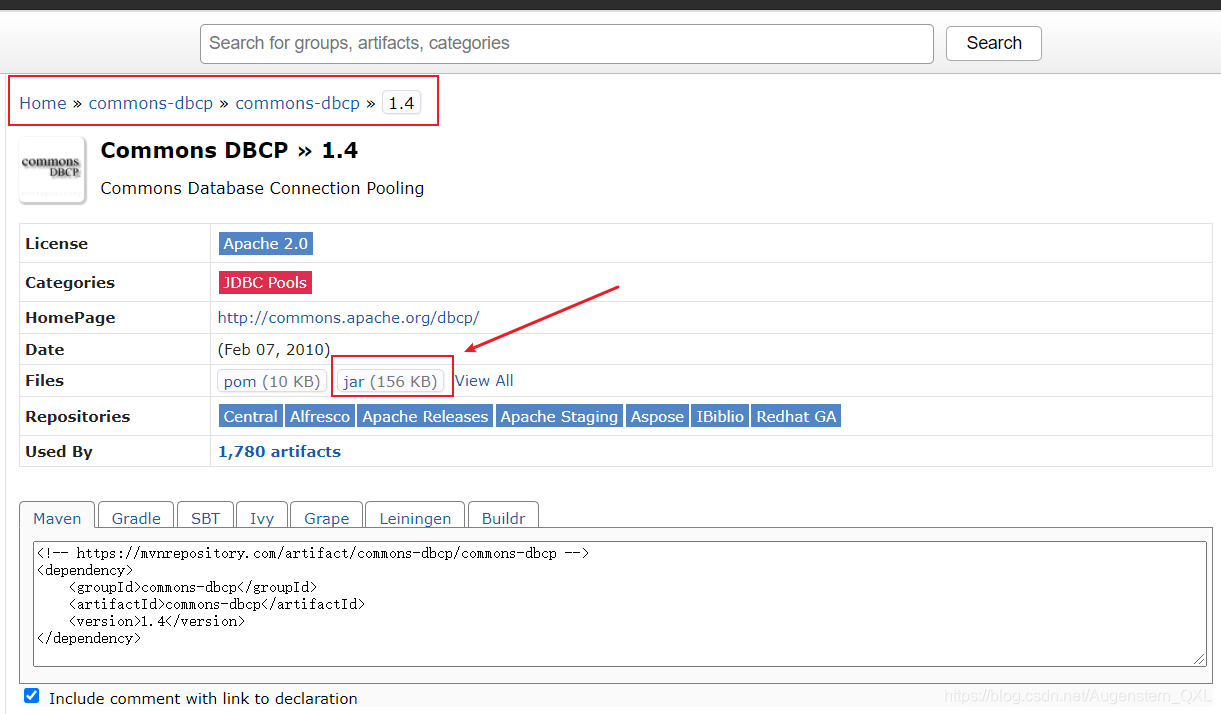
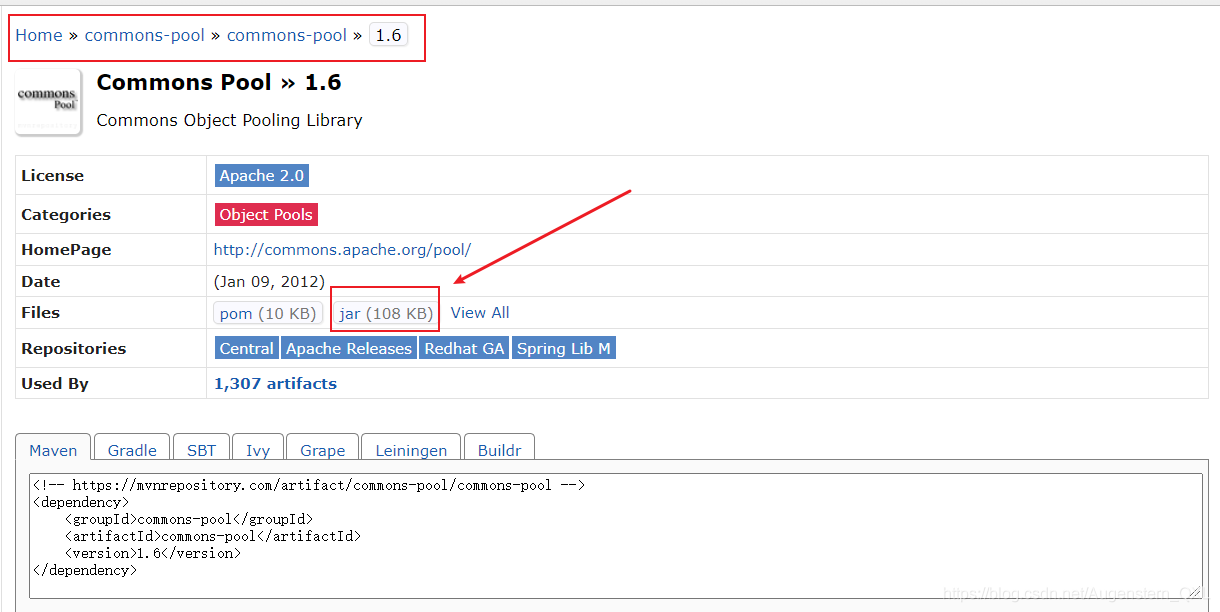
9.2、DBCP 需要用到的jar 包
commons-dbcp-1.4
commons-pool-1.6
在Maven官网下载即可:
在src目录下新建dbcpconfig.properties
1 2 3 4 5 6 7 8 9 10 11 12 13 14 15 16 17 18 19 20 21 22 23 24 25 26 27 28 29 30 31 32 33 34 #连接设置 driverClassName=com.mysql.cj.jdbc.Driver url=jdbc:mysql: username=root password=root #!-- 初始化连接 -- initialSize=10 #最大连接数量 maxActive=50 #!-- 最大空闲连接 -- maxIdle=20 #!-- 最小空闲连接 -- minIdle=5 #!-- 超时等待时间以毫秒为单位 6000 毫秒/1000 等于60 秒 -- maxWait=60000 #JDBC驱动建立连接时附带的连接属性属性的格式必须为这样:【属性名=property;】 #注意:user 与 password 两个属性会被明确地传递,因此这里不需要包含他们。 connectionProperties=useUnicode=true ;characterEncoding=UTF8 #指定由连接池所创建的连接的自动提交(auto-commit)状态。 defaultAutoCommit=true #driver default 指定由连接池所创建的连接的只读(read-only)状态。 #如果没有设置该值,则“setReadOnly”方法将不被调用。(某些驱动并不支持只读模式,如:Informix) defaultReadOnly= #driver default 指定由连接池所创建的连接的事务级别(TransactionIsolation)。 #可用值为下列之一:(详情可见javadoc。)NONE,READ_UNCOMMITTED, READ_COMMITTED, REPEATABLE_READ, SERIALIZABLE defaultTransactionIsolation=READ_UNCOMMITTED
创建DBCP的工具类
JdbcUtils_DBCP.java
1 2 3 4 5 6 7 8 9 10 11 12 13 14 15 16 17 18 19 20 21 22 23 24 25 26 27 28 29 30 31 32 33 34 35 36 37 38 39 40 41 42 43 44 45 46 47 48 49 50 51 public class JdbcUtils_DBCP { private static DataSource dataSource = null ; static { try { InputStream in = JdbcUtils_DBCP.class.getClassLoader().getResourceAsStream("db.properties" ); Properties properties = new Properties (); properties.load(in); dataSource = BasicDataSourceFactory.createDataSource(properties); }catch (Exception e){ e.printStackTrace(); } } public static Connection getConnection () throws Exception { return dataSource.getConnection(); } public static void release (Connection conn, Statement st, ResultSet rs) { if (rs != null ){ try { rs.close(); }catch (Exception e){ e.printStackTrace(); } } if (st != null ){ try { st.close(); }catch (Exception e){ e.printStackTrace(); } } if (conn != null ){ try { conn.close(); }catch (Exception e){ e.printStackTrace(); } } } }
进行测试
1 2 3 4 5 6 7 8 9 10 11 12 13 14 15 16 17 18 19 20 21 22 23 24 25 26 27 28 29 30 31 32 public class TestDBCP { public static void main (String[] args) { Connection conn = null ; PreparedStatement st = null ; ResultSet rs = null ; try { conn = JdbcUtils_DBCP.getConnection(); String sql = "INSERT INTO users(id,`NAME`,`PASSWORD`,`email`,`birthday`) values(?,?,?,?,?)" ; st = conn.prepareStatement(sql); st.setInt(1 ,7 ); st.setString(2 ,"qinxiao" ); st.setString(3 ,"1232112" ); st.setString(4 ,"110123@qq.com" ); st.setDate(5 ,new java .sql.Date(new Date ().getTime())); int i = st.executeUpdate(); if (i > 0 ){ System.out.println("插入成功!" ); } } catch (Exception e) { e.printStackTrace(); }finally { JdbcUtils_DBCP.release(conn,st,null ); } } }
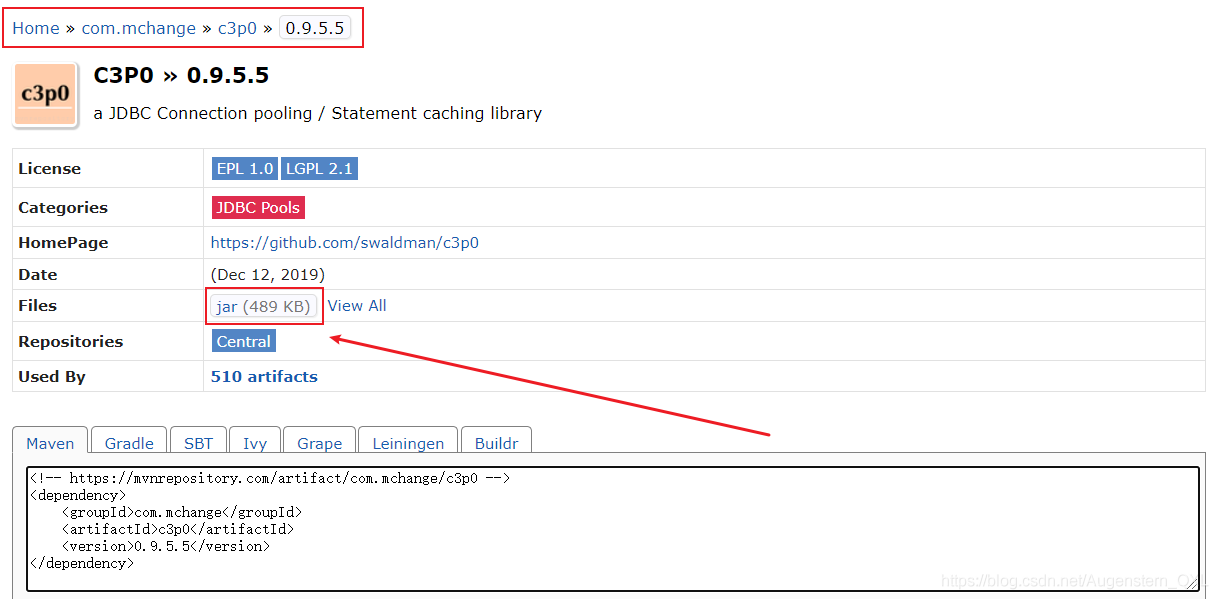
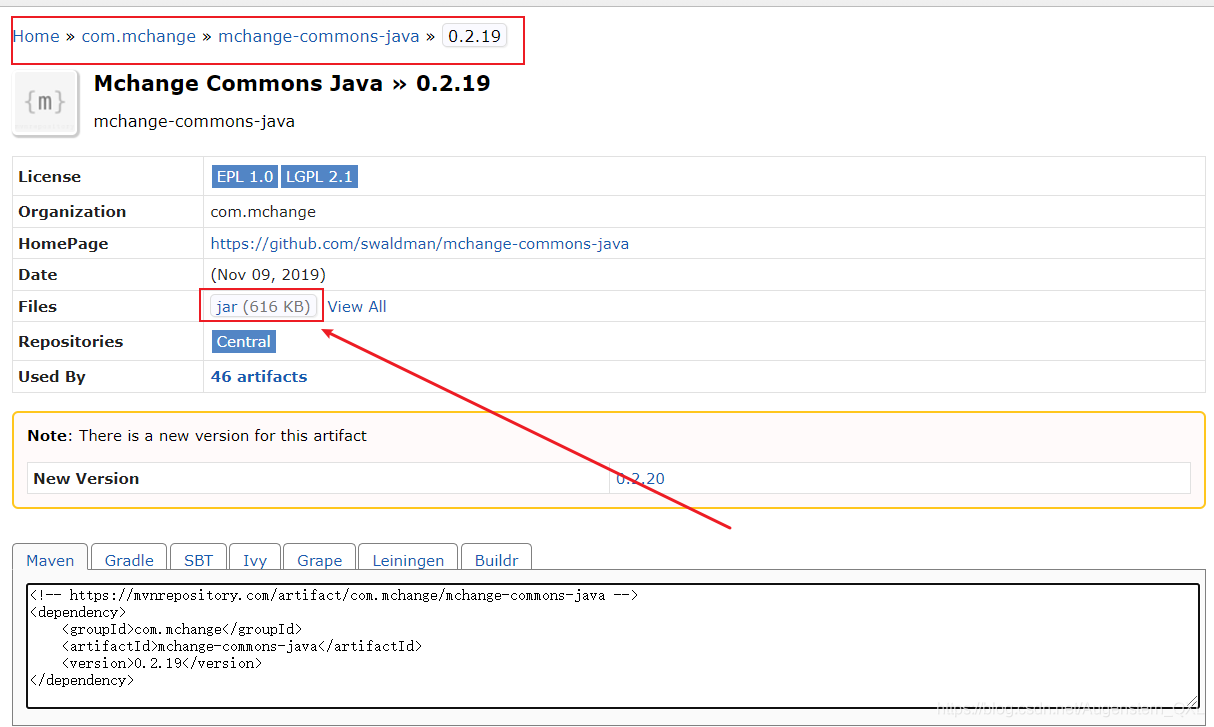
9.3、C3P0 需要用到的jar包
c3p0-0.9.5.5
mchange-commons-java-0.2.19
在maven官网里面下载即可
在src下新建c3p0-config.xml
1 2 3 4 5 6 7 8 9 10 11 12 13 14 15 16 17 18 19 20 21 22 23 24 25 26 27 28 29 30 31 32 33 34 35 <?xml version="1.0" encoding="UTF-8" ?> <c3p0-config> <!-- c3p0的缺省(默认)配置 如果在代码中ComboPooledDataSource ds=new ComboPooledDataSource ();这样写就表示使用的是c3p0的缺省(默认) --> <default -config> <property name="driverClass" >com.mysql.cj.jdbc.Driver</property> <property name="jdbcUrl" >jdbc:mysql: <property name="user" >root</property> <property name="password" >root</property> <property name="acquireIncrement" >5 </property> <property name="initialPoolSize" >10 </property> <property name="minPoolSize" >5 </property> <property name="maxPoolSize" >20 </property> </default -config> <!-- c3p0的命名配置 如果在代码中ComboPooledDataSource ds=new ComboPooledDataSource ("MySQL" );这样写就表示使用的是c3p0的缺省(默认) --> <named-config name="MySQL" > <property name="driverClass" >com.mysql.jdbc.Driver</property> <property name="jdbcUrl" >jdbc:mysql: <property name="user" >root</property> <property name="password" >123456 </property> <property name="acquireIncrement" >5 </property> <property name="initialPoolSize" >10 </property> <property name="minPoolSize" >5 </property> <property name="maxPoolSize" >20 </property> </named-config>> </c3p0-config>
编写c3p0工具类
JdbcUtils_C3P0.java
1 2 3 4 5 6 7 8 9 10 11 12 13 14 15 16 17 18 19 20 21 22 23 24 25 26 27 28 29 30 31 32 33 34 35 36 37 38 39 40 41 42 43 44 45 46 public class JdbcUtils_C3P0 { private static ComboPooledDataSource dataSource = null ; static { try { dataSource = new ComboPooledDataSource ("MySQL" ); }catch (Exception e){ e.printStackTrace(); } } public static Connection getConnection () throws Exception { return dataSource.getConnection(); } public static void release (Connection conn, Statement st, ResultSet rs) { if (rs != null ){ try { rs.close(); }catch (Exception e){ e.printStackTrace(); } } if (st != null ){ try { st.close(); }catch (Exception e){ e.printStackTrace(); } } if (conn != null ){ try { conn.close(); }catch (Exception e){ e.printStackTrace(); } } } }
测试
1 2 3 4 5 6 7 8 9 10 11 12 13 14 15 16 17 18 19 20 21 22 23 24 25 26 27 28 29 30 31 32 33 34 35 36 public class TestC3P0 { public static void main (String[] args) { Connection conn = null ; PreparedStatement st = null ; ResultSet rs = null ; try { conn = JdbcUtils_C3P0.getConnection(); String sql = "INSERT INTO users(id,`NAME`,`PASSWORD`,`email`,`birthday`) values(?,?,?,?,?)" ; st = conn.prepareStatement(sql); st.setInt(1 ,8 ); st.setString(2 ,"qinxiao" ); st.setString(3 ,"1232112" ); st.setString(4 ,"110123@qq.com" ); st.setDate(5 ,new java .sql.Date(new Date ().getTime())); int i = st.executeUpdate(); if (i > 0 ){ System.out.println("插入成功!" ); } } catch (Exception e) { e.printStackTrace(); }finally { JdbcUtils_C3P0.release(conn,st,null ); } } }
结论
无论使用什么数据源,本质还是一样的
DataSource接口不会变,方法就不会变
